Learn, How to Manage Blogger setting
Introduction
Friends, Today we shall learn how to manage blogger setting. In the previous section we learned how to create a blog on blogger.com. After creating a blog and before posting a blog, we have to do some settings in Blogger, so, through this article we will learn to manage our Blog's settings on Blogger Dashboard. Let's start-
First, sign in to Blogger using your Google Account and follow the steps written below.
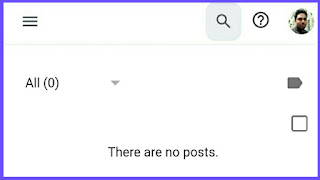
A. After signing in, the interface shown below will open. Here, a list of posts made by you will be shown as-
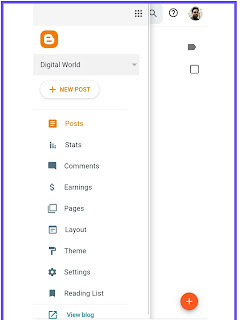
B. Right now, you can see three small lines have been made upwards in the left corner side of this dashboard. By clicking on these three small lines, we see the side menu bar of the dashboard which you can see below.
Blogger Dashboard-
Now we will know about each menu that appears in the side menu bar of Blogger Dashboard.
1. Your Blog Name
The name of your blog appears in this menu, and from here you can create many more blogs by clicking on the new blog dropdown symbol from other names and from the same account.
2. New Post
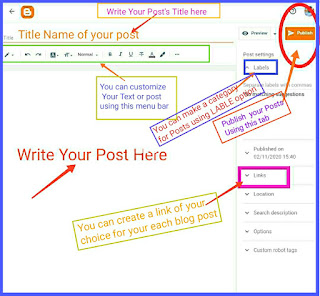
By clicking New Post, you can write a new post for your blog. After clicking on the New Post button, it will open a writing interface of Blogger just like Microsoft Word. As we have shown with the help of the picture below.
3.Post
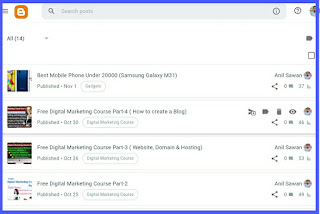
The list of written posts appears as soon as you click on the post menu.
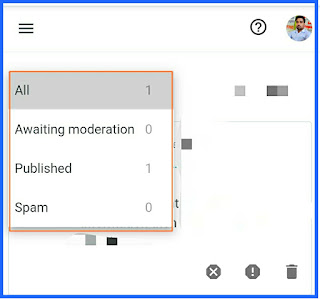
In this interface, you will see another menu named "All", in which the number of published posts till now appears. By clicking on it, three more submenu inside it as Published, Draft and Scheduled are opened. The picture below describes all these three menus and their function.
4. Stats
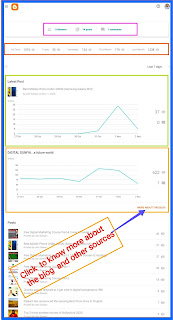
After clicking this menu, the page which will open, we have been visited on our blog or post from page views, blog views, post wise traffic, source wise traffic such as URLs and referring sites, audience & their locations and from which browser Etc. shows.
5. Comments
Clicking the comments tab will open the interface shown below from where you can see the comments of the audience on your post.
6. Earning
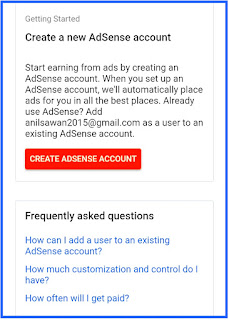
Friends, this Earning tab of the menu bar is very important because by this tab you can earn money by linking your blog with Google Adsense. After clicking this tab, you can set the layout of how to show the ads on your post and send a request to Google Adsense to link your blog to Google Adsense. The interface of this tab is shown below.
7.Pages
Through this tab, you can create different pages on your blog and also post them, making pages is as easy as posting new ones.
8.Layout
Through the Layout tab, you can view the layout of the chosen theme for your blog and edit or customize it accordingly. Although the layout of each theme is different, for example, here you are shown the layout of a theme.
9. Theme
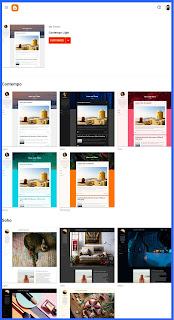
You can choose the theme of your choice for your blog through the Theme tab of Blogger's menu bar, or you can also bring the theme of your choice from outside and upload it to your blog. The Theme tab gives you many options to customize and edit the appearance of your blog. With the Theme tab, you can also backup the existing theme of your blog and restore it as well and also you can edit the HTML of your blog from here. Its interface will look something like this to you.
Clicking the drop-down icon next to the Customize button will open a drop-down like the screenshot shown below where you can backup and restore your theme as well as edit the HTML.
10. Setting
The Settings tab is the most important part of Blogger's menu bar. You can do all the settings of your blog simultaneously through the Settings tab. By the way, under the Settings tab, you have to make many different settings, but all of you are found on the same page. Here we will read about the different parts of the setting.
A. Basic setting
You have to do basic settings of Blogger as per the screenshot given below. Here's how to set up every single part of Blogger's basic settings.
B. Privacy setting
If you want to allow Google search engine to show your blog, then you can turn on the interface button below.
C. Publishing setting
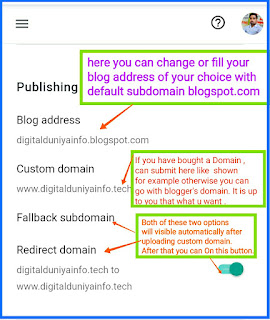
In the publishing setting you get four options which are as follows -
1. Blog address
2. Custom Domain
3. Fallback subdomain
4. Redirect domain
You have to do the setting of these four options like the screenshot shown below.
D. HTTPS Setting
HTTPS setting provides security to your blog. Therefore you must redirect the URL of your blog from HTTP to HTTPS. So you have to turn on the button in front of HTTPS redirect in this section, this will automatically redirect the address of your blog from HTTP to HTTPS. See the screenshot below.
E. Permission setting
Through this setting of Blogger you can manage the settings related to readers and author for your blog. Information is provided to you through the screenshot below and about each part of this setting.
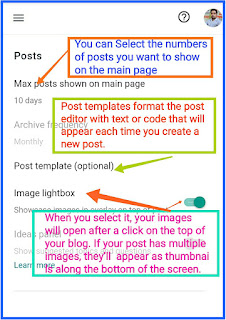
F. Post setting
To set the post in Blogger, carefully read the headings on the screenshot shown below and the information written in front of it.
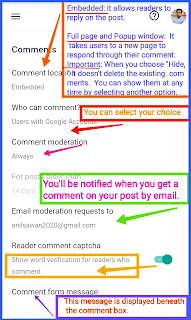
G. Comments setting
You can manage the setting of the comment section of your blog post through the comment setting. Comments about each part of the setting are given in the screenshot below.
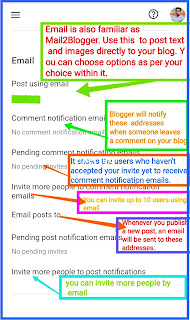
H.Email setting
Here, I am giving you information about each section through the screenshot below, with many lessons in email setting, please read it carefully and follow these information.
I.Formatting Setting
With this setting, you can choose the time zone and time and date format for your blog.
Enable the blog's search description which helps users to select your blog in search results by writing a short description about your blog. For an example see the picture.
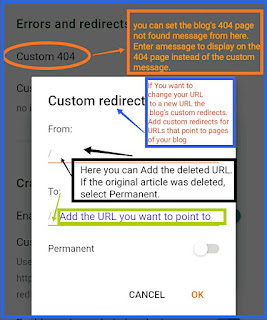
K. Error and redirects
In this section you can set your blog's not found page message and also you can set for redirection the deleted URL to a new URL.
Follow the image-
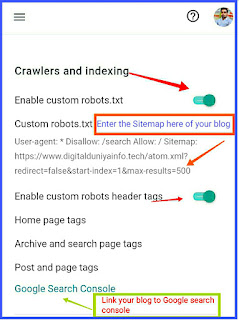
L. Crawlers and Indexing setting
Through this setting you can enable your blog to crawl and index in Google search engine. Follow the instruction given in picture.
M. Monetisation settings
If your blog is ready for monetization then you can enable this setting.
N.Manage blog setting
This setting allows you to manage your blog
such as you can import content in XML file, you can take backup of your blog content, you can manage videos of your blog and also if you want to delete your blog then you can delete your blog from here. Your deleted blog can be restored within 90 days.
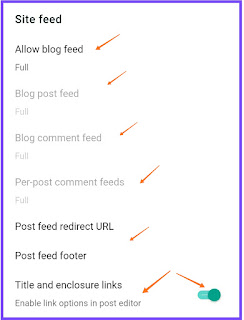
O. Site Feed
This portion of your blog setting consist Allow Blog feed, Post feed redirect URL, Post feed footer and title and enclosure links.
O.1. Allow blog feed Full:
Distributes the whole contents of your post.
O.2. Until Jump Break:
Displays all post content before your jump break.
O.3. Short:
It distributes approximately the primary 400 characters.
O.4. None:
If you decide on "None," your blog's XML feed are going to be disabled.
O.5. Custom:
You can set advanced options for blog posts, comment feed, or per-post comment feed.
O.6. Blog post feed:
You can select what proportion of your post's content you would like to share.
O.7. Blog comment feed:
You can select from here what proportion of your comments' content you would like to share.
O.8. Per-post comment feeds:
You can set here what proportion of your per-post comments content you would like to share.
O.9. Post feed redirect URL:
If you burned your post feed with FeedBurner, or used another service to process your feed, enter the complete feed URL here. Blogger will redirect all post feed traffic to the present address. Leave this blank for no redirection.
O.10. Post feed footer:
It will appear after each post in your post feed. If you employ ads or other third-party feed additions, you'll enter that code here. you want to also set “Allow blog feed” to Full.
O.11. Title and enclosure links:
It adds the title link and enclosure link options within the post editor.
Title links allow you to line a custom URL for your post title.
Enclosure links can be used to make podcasts, MP3s, and other content in your posts playable in feeds like RSS and Atom.
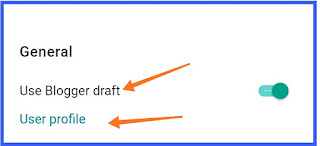
P. General setting
This setting has mainly two parts as following
P.1. Use Blogger draft
You have to enable this to test new features before expected rolled out for all Blogger users.
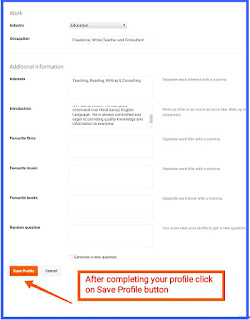
P.2. User Profile
In this section of setting you can manage and make your profile that will appear to the users. Click on User Profile and Follow the instructions given in this section to manage your user profile.
Conclusion
Friends in this Part of Free digital marketing course series, we have learnt about each section present on your Blogger Dashboard and also we have learnt how to manage blogger setting and how to create user profile on it. I hope you will have been fully trained how to manage your blogger dashboard and setting.

















34 Comments
such a nice piece of article. Thank you for sharing your knowledge. This is a very valuable thing you shared. good stuff!!digital marketing agency jakarta
ReplyDeletedfgsdcfvxdcv
ReplyDeleteThanks for always being willing to lend a hand to provide the best knowledge.
ReplyDeletehttps://360digitmg.com/course/certification-program-on-digital-marketing
It is really a great work and the way in which you are sharing the knowledge is excellent.Thanks for your informative article
ReplyDeleteCRM Software
Very interesting blog. Alot of blogs I these days don't really provide anything that I'm interested in, but I'm most definitely interested in this one. Just thought that I would post and let you know. Automated marketing software
ReplyDeleteHashtags cannot be owned, controlled or stopped. In fact, they are so potentially hazardous they should come with a warning label: "handle with extreme care." Within this article, we'll be asking the question: what's the worst that can happen when Bashtags strike? 먹튀해시태그
ReplyDeleteI have read your article couple of times because your views are on my own for the most part. It is great content for every reader. Kajabi vs clickfunnels
ReplyDeleteWeb Design companies constantly strive to go beyond the expectations and requirements of their customers in offering their best services. Generally, companies who want to have a fair web presence have to be tremendously cautious in selecting the best web design company. Social Media Creation, Design, Management and Optimisation
ReplyDeleteThis is very interesting content! I have thoroughly enjoyed reading your points and have come to the conclusion that you are right about many of them. You are great. what is it worth
ReplyDeleteThanks for sharing your Blog. It was really good. If you are looking forwebsite development company in chennaiAt an affordable price then,chennai web development is the best place to boost your website traffic, get more leads and get the best solution for your business.
ReplyDeleteWeb Design & Development
Web hosting
This comment has been removed by the author.
ReplyDeleteNice Post. It help a lot to me. Thanks !
ReplyDeleteYou may also love my Post
MBA Colleges in Delhi
ReplyDeleteThanks for sharing your Blog. It was really gooddigital marketing services in chennai
Digital Marketing Services
On this page you can read my interests, write something special. Business Data
ReplyDeleteBusiness Mailing List Such sites are important because they provide a large dose of useful information ...
ReplyDeleteA debt of gratitude is in order for sharing the information, keep doing awesome... I truly delighted in investigating your site. great asset... marketing 1on1 strategies performed the best
ReplyDeleteIt was a very good post indeed. I thoroughly enjoyed reading it in my lunch time. Will surely come and visit this blog more often. Thanks for sharing. recruitment agency
ReplyDeleteNice information, valuable and excellent design, as share good stuff with good ideas and concepts, lots of great information and inspiration, both of which I need, thanks to offer such a helpful information here. CBT Mass Email Sender
ReplyDeleteThis is the type of information I’ve long been trying to find. Thank you for writing this information. شراء متابعين تويتر
ReplyDeleteMake the most of mainly premium substances - you will find him or her for: CBT Bulk Email Sender
ReplyDeleteEcommerce agency Toronto We are really grateful for your blog post. You will find a lot of approaches after visiting your post. I was exactly searching for. Thanks for such post and please keep it up. Great work.
ReplyDeleteI agree so much. we should all be reinforcing positive feedback within the comment sections. So many good points to take into consideration.
ReplyDeleteWhen people have good things to say about my web site Best Digital Marketing Agency in Kanpur it really makes positive impact.
Thank you for sharing this course. Digital marketing solutions are becoming more and more popular everyday and are being utilized by businesses. An effective digital marketing strategy is necessary to build a company's presence online. Several tactics such as Search Engine Optimization (SEO), Pay-per-Click, Content Marketing, Email Marketing, Social Media Marketing, Mobile Marketing, Marketing Analytics etc. are utilized for this purpose. You have written impressive tutorial, keep sharing your valuable knowledge and expertise. Great blog. Digital marketing course in Chennai
ReplyDeleteIt’s great to come across a blog every once in a while that isn’t the same out of date rehashed material. Fantastic read. Get for more information marketing and communication
ReplyDeleteIt’s great to come across a blog every once in a while that isn’t the same out of date rehashed material. Fantastic read. Get for more information marketing and communication
ReplyDeleteWe are promised to make you 100% satisfied and help to achieve your goals within a short time period. You realize about us and our work when you give an order.Buy Verified Stripe Account. Our service is very easy to buy. We think that the best way to receive our services is to order on the website. If you have any difficulties in our cooperation always You can order us on Skype or Email.Buy Verified Stripe Account
ReplyDeleteWe are promised to make you 100% satisfied and help to achieve your goals within a short time period. You realize about us and our work when you give an order.Buy Verified Stripe Account. Our service is very easy to buy. We think that the best way to receive our services is to order on the website. If you have any difficulties in our cooperation always You can order us on Skype or Email.Buy Verified Stripe Account
ReplyDeleteI am very grateful that I found some helpful content in this post. After reading it , I think that you have good knowledge. Thanks for posting it. Keep it up. Digital Marketing Agency
ReplyDeleteThank you for this article because it’s really informative, I love reading your article and I hope that I will read some more about this stuff, it’s really informative and very entertaining. Thanks a lot and have a great day.
ReplyDeleteAutoCAD Training Institute in Delhi
AutoCAD Training Course in Delhi
A developer's perspective on the expected new features that are available on iPhone 6S and 6S Plus and iPad Pro. While developing iOS apps, programmers have to focus on different models of iPhone, iPad and iPod touch to deliver richer user experience across multiple iOS devices. Despite running on the same version of iOS, the screen size, features and functionality of individual devices differ. And this brings in a good deal of work for the app developers. mobile apps development
ReplyDeleteMasterminding Does this press release infringe on your copyright? It is a violation of our terms and conditions for writers to submit material which they did not write and claim it as their own. digital Agency
ReplyDeleteThanks to share this post with us. I am glad to find your amazing well-explained blog on managed marketing. This marketing strategy focuses on customers and aims to deliver a seamless buying experience to the customers through different channels. If you are looking for the best omnichannel marketing service then trust Symbicore and avail of their best-in-class service.
ReplyDeleteMasterminding Does this press release infringe on your copyright? It is a violation of our terms and conditions for writers to submit material which they did not write and claim it as their own. wordpress hosting
ReplyDeletePhenomenal Blog!!! thanks for your post and awaiting for your new updates...
ReplyDeleteDigital Marketing Course in Chennai
Digital Marketing Online Course
Digital Marketing Course in Coimbatore